Photo Etching
Sept 12, 2022
It had been years since I last did some custom photo etching and as I recall it was a fairly labourious process. I had a couple of projects that needed some custom photo etching but I wondered if it would work with a different process.
Instead of the photoresist chemicals I wanted to see if I could use my Vinyl cutter to create the masks for the photo etching. I created the needed artwork in a graphics program (AutoCAD for one and Corel Draw for another) and exported to my Silhouette cutter software.

Using Corel Draw on my Win XP Laptop for the organic shapes. It still does what I need.

I used AutoCAD for the precision needed. It was exported as a DXF file that my Silhouette cutting software could read.

I have a Silhouette QuicKutz which is at least 3 generations old compared to the current model. The blade still works so I can’t justify spending money on the latest model. I use dollar store self adhesive vinyl since it is only going to be used as a mask and then thrown away so no need to buy the expensive stuff.

Years ago I purchased this etching kit from an electronics store that was going out of business. Looking at what is inside I could buy most of the items inexpensively. The container that holds the etching fluid can be purchased at a dollar store. I have seen ones that are supposed to hold cereal that will do the job. The air supply and air hose can be purchased from an Aquarium store. The stand to hold the material to be etched can be made from styrene shapes.
The most common etching chemical used Ferric Chloride. I am using Amonium Persulphate. One benefit of this chemical is that it is clear so I find it easier to check on the etching process. If you get a container with thin enough plastic you can shine a light from the back and see the progress of the etching.

The material I am using is 0.005” thick brass sheet from the local hobby store.

After the vinyl was cut I transferred it to the brass sheet. I then picked out the areas that will be etched. I draw up my artwork to expose as little of the brass as possible. No need to use up the etching solution on areas not needed. To cover up other exposed areas of brass I covered it in packing tape. This turned out to be an error as you will see later. The better solution I used later was other parts of the self adhesive vinyl sheet.

The brass sheets mounted onto the stand.

Etching in progress. I shone a lamp behind the container so I could monitor the progress without having to pull the stand out of the container all the time.

In progress check. It seems to be etching the bottom faster than the top so I flipped it over at some point.

The first batch of frames etched. I would make 3 more. This is the back side where I put on the packing tape. I was not careful when putting the packing tape on so I didn’t make sure there were no air bubbles and that the packing tape was not completely flat.
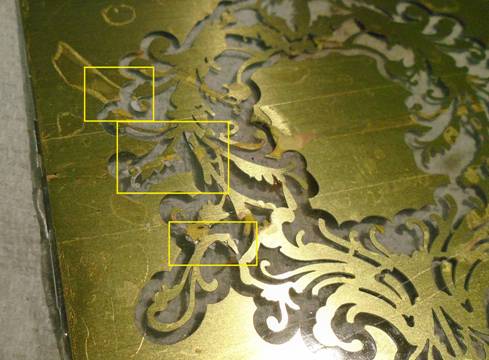
So because of air bubbles and the tape not completely flat the etching solution was able to get behind the front surface and etch from the back. The areas in the yellow squares have etched from the back and have damaged the desired areas.

Here is where the packing tape was a mistake. When it came to remove the self adhesive vinyl that went pretty quickly. The packing tape was another matter. I finally managed to do it with some Goo Gone after trying the nail polish remover with little success. I was next going to try lacquer thinner.
The next time I was etching stuff I used spare self adhesive vinyl to cover areas I did not want etched and it was much easier to remove later.


Here are the etched items.
Conclusion
It is sure a much easier method to etch stuff than using the photo resist chemicals. The limitations of this method is the resolution of the vinyl cutter and the vinyl used. I think if you need fine detail then you would have to use the old method but this is one way to get stuff made and is much quicker.